Monday, September 10, 2012

Polenta cut with a string, like Grandma used to make


Usually I make soft polenta, I always preferred the soft type that you spoon into a plate and cover with a thick wild mushroom sauce or a stew, but memories are coming back of the type of polenta my Grandmother used to make in the North of Veneto: it was dense and stirred with a thick wooden stick in a gigantic pot over a wood fire, and then she pour the hot golden mass on a big wooden tray where it set hard in no time. She kept the polenta in the drawer of the kitchen table so you could get a slice at any time, and attached to the wooden tray there was a piece of string used to slice the polenta, so you didn't even need a knife.


Cutting polenta with a string


Of course I attached a string to my chopping board: I wanted to do the same as Grandma, and I hope that you will like the idea too. Serve the slices with your favorite casserole, or when the polenta is cold just grill the slices or fry them, or cut them really thin and use them instead of pasta for a gluten free lasagna.


Photos and Recipes  by Alessandra Zecchini ©

Thursday, August 30, 2012

Tiny new potatoes, two recipes with herbs and spices (and other veggies too...)


Potatoes and Cape gooseberries


The veggie garden is full of small potatoes, I picked a few, some really tiny, but I didn't want to leave them there, and the kids love them. I washed them and boil them, in three batches, from the largest to the tiniest.


After boiling them, the larger (but still new potato size) were then sautéed together with small steamed carrots and green beans in olive oil, garlic, smoked paprika, cumin seeds, chili flakes, coriander seeds, and salt. A very satisfying combo!


The smaller potatoes were sautéed with garlic, olive oil, rosemary, sage and salt. A real luxury to eat such small potatoes, but I need to make more space in the garden, and there are plenty more to dig up! 


Any suggestions for more tiny potato recipes?

Photos and Recipes by Alessandra Zecchini ©

Sunday, August 19, 2012

Sweet potato Vegan and gluten free cakes


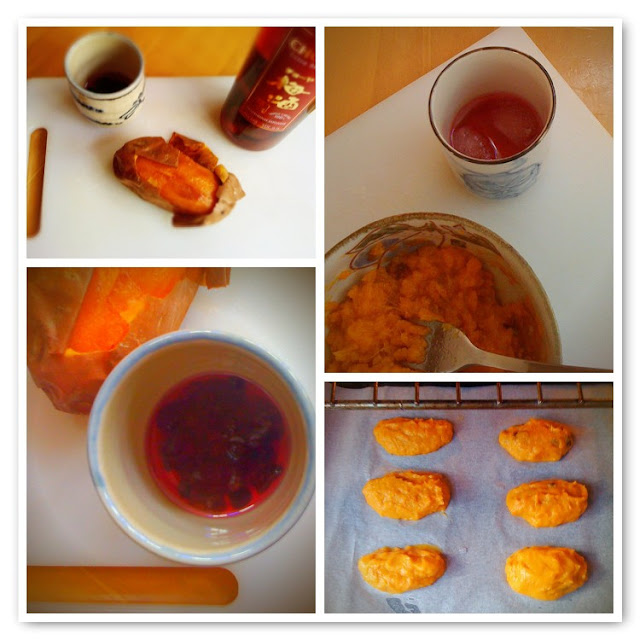
 One of my favourite Japanese sweet is the baked sweet potato wagashi. I made something similar to this before, and I thought that the New Zealand kumara looks like a Japanese potato... but then I ended up with something completely different :-).


First of all kumara are much softer that Japanese sweet potatoes, then I only had an orange kumara at home (the red ones are better because they are white inside). I thought of baking my kumara, as steaming it was going to make it even softer and in the meantime I drunk a bit of Umeshu,  (my husband came back from Japan with a bottle of Choya Umeshu, sweet plum sake) and decided to soak a few sultanas in some too to add to my cakes. Once my kumara was done I quickly realized that it was going to be far too soft for molding, so I reverted to plan B, i.e. not shaping the sweets by chakin shibori (with a muslin cloth or handkerchief), but simply dropping them on the baking tray with a spoon! For one mashed kumara I added 2 tsp of brown sugar, and then 'dropped' three tablespoons of the mixture on the baking tray. I did the other three adding the sultana soaked in Umeshu, just to make a variation. 


 I baked everything at 180°C for about 15 minutes. To look at them I think that these are among the ugliest sweets I have ever made, but they tasted incredibly good, especially the ones with the sultana. I will make them again, but I will also look for some more 'floury' sweet potatoes (not kumara) so if you know where I can get some in Auckland please let me know!


Photos and Recipes by Alessandra Zecchini ©

Monday, August 6, 2012

Daikon and red beetroot raw "crackers"


I used a Japanese plum flower cutter, and a small heart cutter. The daikon and beetroots can be raw of cooked, it actually works well with raw daikon and cooked beetroot, but if you are on a raw diet keep everything raw. For dressing I just added a drop of olive oil and salt before serving. 


Photos and Recipes by Alessandra Zecchini ©


Tuesday, July 31, 2012

Daikon and Carrot Salad with Miso and Toasted Sesame Seeds


Peel a carrot and a piece of daikon as big as two carrots with a vegetable peeler. Discard the outer skin, and then continue 'peeling' to obtain long thin orange and white vegetable 'ribbons'. As you work drop the carrot and daikon strips into a bowl filled with water and lemon juice. Let the vegetables soak for about 30 minutes. In the meantime toast a tbsp or so of sesame seeds in a hot frying pan, and then mush them lightly with a mortar and pestle (I have a Japanese one for this, but any mortar and pestle will do). Set aside. In a small bowl thin one tbsp of miso (white or red) with a little hot water, or hot vegetable stock, into the consistency of a salad dressing (i.e.: not too runny, but not as thick as to be impossible to fold into a salad). Add 1 tbsp of soy sauce too, if you like (or gluten free tamari sauce). Drain the vegetables and add the miso dressing. Mix and divide between 4 bowls (if eating immediately, otherwise store in the fridge, covered, it will acquire even more flavour!). Before serving top each bowl with a pinch of crushed toasted sesame seeds. 


Photos and Recipes by Alessandra Zecchini ©

Friday, July 27, 2012

Italian borlotti beans cooked in a skillet


 The most famous borlotti beans are from the village of Lamon (not far from my Mum's place).


Fagioli in Padella


Soak the borlotti beans overnight, rinse and then cook with plenty of water and a bay leaf. Usually I add salt only at the end of cooking, then I keep the broth and a few beans for soup, and drain the rest to cook separately or use them in salads. Here I made them 'in padella' (in a skillet).

Sauté a shallot (sliced) or a couple of peeled garlic cloves with two tbsp of olive oil. Add the cooked borlotti beans, then about one cup of Italian tomato sauce (passata) and one cup of bean broth (or vegetable broth). Simmer on low for about 20 minutes, when the sauce thickens add half a tsp of smoked paprika (or some black pepper), adjust for salt and then finish everything with some more olive oil and plenty of fresh chopped parsley. 

In the past I didn't use chopped parsley with the paprika, but I do now, if I can: I find that parsley makes the beans easier to digest without... gas! Do you use parsley agains the 'effects' of beans? I also know that kombu seaweed, and bay leaves, are supposed to help, but if you know any other trick do let me know :-).


Photos and Recipe by Alessandra Zecchini ©

Monday, July 16, 2012

Aunt Alice's Artichokes


I have to say that the ingredients and cooking method are very similar to mine (and my mother's). We call it Roman style, possibly because both my Mum and my Aunt learned to make this in Rome (and I learned from them). But there are two main differences between my usual recipe which I always make in New Zealand (recipe here) and this one, simply due to ... availability!!! In NZ artichokes are still rare and quite expensive, so when I get a few I cook them with all the hard outer leaves (to be scraped with teeth at the table until you reach the heart) while here in Italy artichokes abound and so we can discard the outer leaves and cook only the tender hearts. 

The other difference is that while I cooked the whole artichokes "flower side up", the artichokes hearts with stalks are cooked "flower side down", and in this way you can leave a bit of the stalk in too, they are yummy and tender!

All you need to do is to:

Clean very well the artichokes discarding all the hard outer leaves. Also peel the stalks and keep up to 5 cm attached to the floret. As soon as one artichoke is cleaned drop it immediately in a bowl full of water and lemon juice or lemon slices. Keep the artichokes in the lemon water until cooking time. 

Finely chopped Italian parsley with garlic and salt, and then use this mixture to fill the centre of the artichokes (so far the recipe is like for the these artichokes) but then place the artichokes upside down into the pot (like in the photos, I only turned one up to show you what the inside would look like at the end of cooking), add a little extra virgin olive oil, a few more slices of garlic (if you like), another  pinch of salt, and a couple of fingers of water. Place on the stove on low, cover with a lid and simmer for about two hours, adding water from time to time, if needed.

Now there is one last thing to be said here: Aunt Alice had a wood fire stove (stufa, a bit like an Aga, I should remember to take a photo sometimes!) and in this way you can cook the artichokes (and many other dishes) really slowly, all they long... so the ones that she makes always have a special taste. Plus she has the patience to clean over 15 artichokes!


Photos and Recipe by Alessandra Zecchini and Aunt Alice ©

Friday, June 29, 2012

Castagnaccio, Vegan, gluten and sugar free chestnut flour cake


First of all I have to inform you that I was raised on chestnuts, and chestnut flour. We made many things with the flour, mostly fritters (you can find the recipe here) and castagnaccio. There are so many versions of castagnaccio, the main being just chestnut flour and water, with a pinch of salt (optional) and a sprig of rosemary on the top. The best thing is that chestnut flour is naturally sweet, and that you just need water to mix it, making it the perfect low fat (chestnuts are the only low fat nuts) high protein, gluten free and vegan treat!


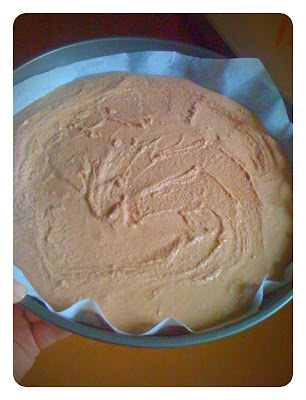
I mixed chestnut flour with enough water to make a batter, and this time I added 2 tbsp of cocoa (cocoa also go well with chestnuts) and a very small pinch of salt. No sugar needed. Pour the batter into a large baking pan lined with baking paper and bake everything at 180°C until the cake is ready (about 20 minutes, check with a toothpick). Let it cool down before serving. Unfortunately I forgot to take the photo on the first day, so this was the morning after and the top of the castagnaccio had cracked like a dry desert... but it was still great for breakfast :-).


Photos and Recipe by Alessandra Zecchini ©

Friday, June 22, 2012

Award, pass it on!


Shells from Anawhata beach, New Zealand,
Alessandra Zecchini ©


One Lovely Blog Award

I would like to thank Rika of Vegan Miam for this award! I am now passing it on, and these are the rules: 
  • Link back to the blogger who nominated you.
  • Paste the award image on your blog, anywhere.
  • Tell them 7 facts about yourself.
  • Nominate 15 other blogs you like for this award.
  • Contact the bloggers that you have chosen to let them know that they have been nominated.
  • Resume blogging your regular posts.

Seven facts about me:

- I’m Italian and I live in New Zealand
- My favourite vegetables are porcini mushrooms... but technically they aren't vegetables :-).
- My favorite fruit is mango.
- My favorite ingredient is olive oil, I often travel with a small bottle to add to my salads.
- I love cooking, reading and traveling.
- I like to eat colorful food.
- I am a keen forager ;-).

Saturday, June 9, 2012

Green Cauliflower and Red Radicchio


What do vegetarians eat? Lots of vegetables! Some people call it rabbit food, I don't know why, I swear to you that we are not rabbits!  Let's start with the red radicchio, my brother made this: cut the red radicchio into strips and place onto an oven tray lined with baking paper. Drizzle with extra virgin olive oil, salt and dried oregano (he says that dried thyme is better but we didn't have any).  Bake until the red par of the leaves is crispy (and most of the bitterness is gone!).


 And what about this lovely green cauliflower? I think that green cauliflowers taste 'sweeter' than the white ones, and this one did! I just boiled it al dente, let it cool down and dressed it with extra virgin olive oil, salt and Aceto Balsamico di Modena. Simple but perfect!


Photos and Recipes by Alessandra Zecchini and her brother ©

Sunday, June 3, 2012

Kumara and Celery Soup


This is such a classic NZ soup, everybody seems to know how to make this one: You just need some kumara (I used the red ones, peeled). Cook about 2 large kumara with 3 or 4 celery sticks (with leaves, most Kiwis do not add the leaves here, but celery leaves have lots of flavour and they are perfect for soup) in a litre of light vegetable stock. When the celery and kumara are soft blend well and serve. 


Serves 4.


Photos and Recipes by Alessandra Zecchini ©

Sunday, May 27, 2012

Vegan Banana Cake, with sultana and grappa


Ingredients:

2 tbsp sultana
1 small glass of grappa
5 ripe bananas
A few drops of lemon
100 g icing sugar + some for dusting
100 ml vegetable oil
200 g self rising flour

Soak the sultana in the grappa. Mush the bananas with the lemon juice, add the sugar and the other ingredients and beat well, then fold in the sultanas with the grappa. Grease a cake mould and pour the cake mixture in, bake at 180°C for approximately 30 minutes or until a toothpick inserted into the cake comes out clean. Reverse onto a serving plate and serve warm or cold. This cake is very moist and delicious, great with tea or coffee, I even have it for breakfast (don't worry about the grappa, you can barely taste it and the alcohol is all gone!).


Photos and Recipes by Alessandra Zecchini  ©


This recipe is for Sweet New Zealand, the monthly blogging event hosted this month of May by Jemma

Saturday, May 19, 2012

TTT: Taiwanese Tofu with Tomato


Ok, the TTT name is my invention, but the recipe is really Taiwanese. Several years ago I had a Taiwanese baby-sitter, she was also vegetarian (in Taiwan there is a strong vegetarian Buddhist tradition) and she didn't cook with garlic, onion, chives and leeks (this is the old Buddhist tradition). She taught me a lot of recipes... no, not recipes, maybe I should say 'ways of cooking'.

This recipe is so basic that I almost thought of not putting it on the blog, but the fact is that it is quite amazing!! In my Italian brain I never thought of combining tomatoes with tofu and soy sauce this way, it didn't feel right, and I was quite skeptical when she showed it to me. And then I tasted it: WOWOWOW, it works!

And not only it works, the kids love it, and it is so easy and quick... and in a way it feels so ... ethical!
Yes, just a few low cost ingredients, not much time or energy needed, and lots of proteins.

I usually used some red ripe tomatoes, but I had some ripe little orange tomatoes to finish, and so they went: cut and placed into the frying pan/wok/pot with a little vegetable oil (olive oil works well) and a small pinch of salt. Of course you could also add garlic, but the original recipe, as I said before, doesn't allow for allium of any type. Cook on high, stirring constantly, when the tomatoes start to mush into a sauce add the cubed tofu, stir and then add one or two tbs of soy sauce (I use only Japanese soy sauce, Kikkoman or Yamasa) or gluten free tamari sauce if you are gluten free, and stir until the tofu is really hot (a couple of minutes only). Top with fresh chopped coriander if you like, and serve immediately with rice or noodles.


Photos and Recipes by Alessandra Zecchini ©


I enter this recipe in Cooking to Combat Cancer