Thursday, December 30, 2010

Year of the Rabbit, Fondant and Marzipan Rabbits


Next year will be the year of the Rabbit: a very important year for our family as my daughter is a rabbit! I made some little bunnies, the white one is made with fondant, and the cream bunny is made with marzipan.


To show you the sizes I put a cherry next to them :-). I thought I did a pretty good job, and them my daughter showed me the rabbit she had made...


What do you think? Isn't it cute!!!


Photos and Recipes by Alessandra Zecchini ©


Monday, December 27, 2010

Foraging Soup


Foraging is back in fashion so get out in the garden (or bush, or field...) and start picking!

I got a few young borage leaves, some watercress, some puha, then I added a leek and a potato from my garden. I washed the leaves very well, peeled the potato, and cooked everything with water, then I blended the soup, added salt to taste, and finished with a drizzle of good extra virgin olive oil.


Photos and Recipes by Alessandra Zecchini ©


Saturday, December 25, 2010

Italian Tomato Sauce for Pizza and Pasta


Photos and Recipes by Alessandra Zecchini ©


Here is how to make the easiest tomato sauce ever. This recipe, like the pizza dough recipe, comes form my book Savour (New Holland Publishers). As a bonus this sauce can be used for pasta and a variety or other dishes, its doses can be easily halved or doubled and, if you try it once, you will be hooked!

Ingredients
2 x 400 g / 14 oz cans Italian peeled tomatoes
2 garlic cloves
2 tbsp olive oil
a few fresh basil leaves
salt to taste.

Dose for 6 flat pizze or one very large deep base pizza slab.

Place the content of the two Italian peeled tomato cans into a blender. Add two cloves of garlic, peeled, and blend until smooth. Put the “juice” into a large frying pan, and some water from rinsing the cans (optional). Bring to boil and then simmer, stirring from time to time, for at least 30 minutes, or until the sauce is so thick that when you stir it with a wooden spoon you can see the bottom of the pan. At this point as the salt to taste, the olive oil and the fresh leaves of basil. Cover and keep aside until needed.


Wednesday, December 22, 2010

How to make Marzipan Fruit


It is raining in Auckland today, but the bush looks happy and green, and the water tank is filling nicely (yes, we drink rain water!). It is also the last day of school for my daughter, holiday mood in the air, Xmas trees alight. The boy is already home, with a friend who is staying for a sleep over. They are playing with lego: domestic bliss for me!

Yesterday I posted about making your own marzipan, and today I'll show you my little fruit.
For the marzipan recipe click here, and for the colours I used some spirulina powder dissolved in hot water, and some juice from berries.


Shape the fruit with your fingers, you can either colour the marzipan before, or you can paint it later using a small brush, or opt for a combination of the two for a stronger colour.


For the stalks I used the smallest cloves that I could find, but this is because I made some miniature fruit! I like miniatures, in a past life I am sure that I belonged to a Jane Austen world where ladies painted miniatures and embroidered delicate patterns (or so I wish!).


To show you the scale of the fruit I put a NZ dollar coin in the mini basket. The kids didn't have the heart to eat the fruit yet: they told me that it is too pretty! But they will get over that soon!


Photos and Recipes by Alessandra Zecchini ©

Tuesday, December 21, 2010

How to make marzipan sweets


This is another recipe from my book Sweet As, and something that I love to make for Xmas.
I would like to say that for marzipan you should get the best almonds around, natural, but here in New Zealand the almonds taste different from the ones in Italy. They are imported, not sure where from most of the time, but they are not top grade almonds.

Still, with a few tips, you can make your marzipan taste great even with 'regular' almonds! Buy them natural, not blanched, you need to blanche then yourself or the result will be too dry.


To blanch them you need to put them in boiling water for a couple of minutes, and then add cold water and take the skin off, one by one. For this recipe you will need:

200 g almonds
100 g icing sugar
5 apricot kernels.


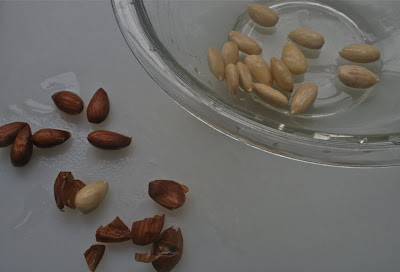
As I was saying before, the almond here have little taste, so I like to collect the stones from apricot and get the almonds out. They are a real pain to crack! In the photo above you can see apricot stones and kernels.


The apricot kernels too need to be blanched, in fact the skin is poisonous! And you should not eat too many, 5 for 200 g of normal almonds is what I use, and they give the marzipan a nicealmondy taste. In the photo above you can see an apricot kernel (left) , and a normal almond (right). Try and taste an apricot kernel, they are bitter, but more aromatic.


Blend the blanched almonds and apricot kernels, still wet from blanching, until they are very fine, almost a paste. You may need to do this a few times, scraping the sides of the food processor.


Place in a bowl with the icing sugar and mix, first with a spatula, and then with your hand, like for a dough. At first it will seem dry and crumbly, but then it will all come together in a paste.


And here you have it, almond paste to work with. If you like you can also add a little grated lemon zest, or use vanilla sugar for a delicate floral hint.


You can colour your marzipan. I like to go for natural colours, so I made green with spirulina powder dissolved in water, and red with berry juice.


Roll and cut, like for gnocchi, and then shape with your fingers. For my main sweets I made simple shapes, but you can make fruit (on the blog tomorrow!!).


To top the marzipan with fruit I used more blanched almonds and pistachio, plus some walnuts. I made a syrup with a little sugar and water, and when hot I put the nuts into it to coat them and make them shiny and sticky. Then I placed a nut over each little marzipan sweet (I used tweezers for this, as the sugar was still hot!).


Ready to be eaten, and pretty too! A perfect Vegan and gluten free Christmas treat! And you can also use it to stuff dates and dried figs, or cover it with bitter dark chocolate.


Photos and Recipes by Alessandra Zecchini ©


Sunday, December 19, 2010

Vegan Panforte, an Italian Christmas Treat!


As a child I always had panforte for Christmas. It came in a packet, and my brother and I loved it: it was special. Then I moved to London, and panforte became an even more expensive luxury. Let's not talk of Japan and New Zealand! So about a decade ago I decided to make my own.


A made a few variations this year. In a recent comment Yari from Il cucchiaio di legno blog told me that industrial Vegan Panettone is not exactly 'nice'. I thought that it is hard to be a Vegetarian or a Vegan at Xmas. Panforte is almost Vegan.... it has honey in it. It may be interesting to know, for some of you, that in New Zealand there are some Vegans who eat honey, in fact they are bee-keepers. They say that they don't kill the bees when collecting honey, and that the insect are vital if we are to get fruit in this country. But NZ must be an exception, for all I know Vegans in other parts of the world do not eat honey, so I decided to make this panforte with golden syrup, for Yari :-)

Ingredients

Golden Syrup, 2 tbsp

Vanilla flavoured sugar, 2 tbsp

Vanilla Icing sugar, 2 tbsp, plus more for dusting

Almonds (natural), 150 g /5½ oz

Citrus peels, 150 g / 5½ oz

Candied Fruit (I used a mixture of papaya, melon, and mango) 200 g / 7 oz

Plain flour, 100 g / 3½ oz

Powdered coriander, 1 tsp

Powdered cinnamon, 1 tsp

Powdered nutmeg, ¼ tsp


The vanilla flavoured sugar is white sugar kept in a sealed jar with a vanilla stick in it.


Put the golden syrup, vanilla sugar and icing sugar in a bowl with two tbsp of water, and dissolve on low heat in a pot of water (Bain Marie or double boiling).


Remove from heat and add fruit, almonds and all the other dried ingredients. At this point you will start to fill the aroma of the spices, it really feels like Christmas!


Line a 22-23 cm round tin with baking paper and, if you have it, line it with some rice paper. Fill with the mixture and cover with more rice paper, pressing down well. Wet the top rice paper with water so that it will not burn.


Bake at 160°C (325ºF) for 30 minutes, Remove from the oven, but leave in its baking tin, and cover with a thick layer of icing sugar. Serve cold, and only small slices (it is quite filling!).


Photos and Recipes by Alessandra Zecchini ©


Saturday, December 18, 2010

Green Dip (watercress, rocket and basil)


I went foraging in the neighbor's property (he is cool about it) to pick some watercress. It is a bit late for watercress, the flowers are already out, but I could still pick some to mix to other greens to make a tasty dip.


Green Dip


Ingredients:
A mixture of watercress, rocket (rucola), and Genovese basil, (or any greens and herbs you like)
3 handfuls of cashew nuts
2 garlic cloves, peeled
a little water to blend
Salt to taste
Extra virgin olive oil to finish

Blend the first 4 ingredients, then add salt and olive oil to taste. Serve with homemade bread, as a dip or as a spread.


Photos and Recipes by Alessandra Zecchini ©


Tuesday, December 14, 2010

Salad with Red Radicchio, Florence Fennel and Walnut


A lovely and crisply salad made with fresh mixed leaves and red radicchio (the round type, which is crispy and lovely to eat raw). I find red radicchio a bit bitter, this is why I like to mix it with other green leaves. Then I added some finely cut Florence fennel, and some freshly shelled walnuts. For dressing I just used some good extra virgin olive oil, some lemon juice and some salt.
Photos and Recipes by Alessandra Zecchini ©


Monday, December 13, 2010

Strawberries with Aceto Balsamico Tradizionale di Modena


Nothing tastes like Aceto Balsamico Tradizionale di Modena. Made following traditional methods, and with at least 12 years of aging and refining in the attics of Modena, this product is a precious condiment which is suited to a variety of dishes. If you happen to be in Modena I can recommend a visit to the museum of the Traditional Balsamic Vinegar of Modena, in the nearby small city of Spilamberto, where I got a 25 years old balsamic, which is just amazing!


Strawberries with Aceto Balsamico
Tradizionale
di Modena


1 punnet of strawberries
1 tsp Aceto Balsamico Tradizionale di Modena (ABTM)
1 tbsp white sugar

Hull and cut the strawberries, place in a bowl with the ABTM and
sugar, stir and let marinate for a few hours.
Serve by itself or with Soy Vanilla ice-cream.


Photos and Recipes by Alessandra Zecchini ©


Friday, December 10, 2010

Orecchiette with Broccolini and Fake Parmesan


First I made the fake parmesan: I fried some breadcrumbs with olive oil and garlic, and a little salt. This is also called 'poor people parmesan' in Italy, it is actually traditional for some pasta courses, and actually preferred to parmesan for some dishes, like this one.

When the breadcrumbs were golden I put them aside and used the same saucepan to cook the broccolini (no rinsing of the pot required, just add a little more olive oil and fresh garlic). Fresh broccolini need very little cooking, even less than broccoli, I just sautéed them with olive oil and garlic, and a pinch of salt, then turned the heat off, put the lid on the pot for a few minutes, and the remaining heat did the rest of the cooking. You need a pot with a good lid!

In the meantime I cooked the orecchiette in plenty of salted boiling water. I followed the packet instructions for this, as different manufacturers seem to have different timing and orecchiette are usually more 'crunchy' than other types of pasta.

Once ready I drained them and placed them in the pot with the broccolini, I stirred and then topped everything with the fried breadcrumbs.

A chilli can also be added to the broccolini for a hotter taste.

The broccolini are from my garden :-)

Photos and Recipes by Alessandra Zecchini ©


Wednesday, December 8, 2010

Summer Salad with Flowers


Summer salad from my garden: rocket, cherry tomatoes, cucumber, orange and yellow calendula petals and borage flowers. Dressed with extra virgin olive oil, salt and a drop of Aceto Balsamico Tradizionale di Modena.

Photos and Recipes by Alessandra Zecchini ©

Sunday, December 5, 2010

Japanese Vegetables with Miso and Sesame Dressing


Japanese Vegetable Market, Kyoto. Photo by Alessandra Zecchini ©


Ingredients:
For the dressing:
2 tablespoons toasted sesame seeds
1 tablespoon miso paste
A little dashi (vegetable or kombu seaweed stock).

For the vegetables:
1) Choose one vegetable among the ‘white Group’: Potato, Daikon (available in Asian stores), cauliflower…
2) One vegetable among the ‘orange/yellow group’: Carrot, pumpkin, kumara…
3) One vegetable among the ‘green group’: Broccoli, spinach, snow peas, asparagus…
4) Cherry tomatoes to decorate.
To make the dressing grind the toasted sesame seeds with mortar and pestle, then add the miso paste and mix. Slowly add enough dashi (stock, hot or cold) to make a smooth and runny paste. Set aside.

Choose your vegetables, one from each colour group (considering that Japanese food must also be beautiful to look at), and cut into pretty slices. Boil the potatoes, kumara and daikon, but just steam or blanch all other vegetables, as they still need to be crunchy and colourful. Arrange the vegetables in individual bowls as nicely as you can (for example, one small potato, two carrot slices, and 3 snow peas) and drizzle over the dressing. Decorate with a cherry tomato and serve, cold or lukewarm.

Suggestions
It is important to boil or steam the vegetables separately, or they will all taste the same. The leftover dressing can be stored in the fridge for a few days. Make this salad into a main by adding a square of Japanese soft tofu (the type that can be eaten row).

Photos and Recipes by Alessandra Zecchini ©

Wednesday, December 1, 2010

Artichoke Risotto with Baby Yellow Zucchini and Flowers


Photos and Recipes by Alessandra Zecchini ©

Ingredients

2 artichokes
Lemon juice
2 garlic cloves, peeled
1 cup Italian parsley
Salt to taste
Extra Virgin Olive oil
1 shallot
500 g arborio rice
500 ml vegetable stock
5 yellow baby zucchini (as small as a finger) with flower still attached
Calendula petals to decorate

Serve 6

Cook the artichokes one day earlier. In a bowl filled with water and lemon juice wash the artichokes and cut out a few of the hardest leaves (petals). Finely chop the garlic cloves with the parsley and a little salt and then use to stuff the artichokes. Place in a small saucepan, drizzle with olive oil and cover halfway through with water. Simmer until the outer leaves easily detach from the heart, adding water from time to time if necessary. The water will make a lovely broth.

The day after scrape all the flesh from the hardest outer leaves and place in a small saucepan with the artichoke hearts and their water (discard the hard bits). Mush flesh and hearts with a wooden spoon, and gently reheat. Keep warm and set aside.

Finely chop the shallot andsau with 2 tbsp of olive oil. Add the rice and when this is lightly 'toasted', add the artichokes and their water. Stir and then continue cooking, adding some hot vegetable stock little by little, and stirring often. If the risotto is too dry you may need to add a little more stock or boiling water.

Clean the yellow zucchini, do no detach the flowers, just remove the sepals. When the risotto is almost cooked add the zucchini, gently stir in to cover them completely with the risotto, turn the element off, cover the pot with a lid and let it stand for 5 minutes. The zucchini are very small and should cook with the heat of the risotto.

To assemble, divide the risotto between 6 plates, with one baby zucchini for each plate, sprinkle with calendula flowers, and enjoy.