Sunday, March 20, 2011

Nigella Potatoes

This is not a Nigella Lawson’s recipe, but a recipe using nigella seeds.
 I am not sure if this could be defined as Indian food, certainly it is Indian inspired, I served it with a Dahl and basmati rice, and it was a winner!!! Of course your comments are welcomed!


Nigella Potatoes

Ingredients:
500 g potatoes (Agria or similar ‘floury’ potatoes)
2 tbsp vegetable oil
2 garlic cloves, peeled
1 tsp nigella seeds
half tsp ground coriander
half tsp cumin powder
1 tsp turmeric
salt to taste
one cup fresh coriander (or parsley) leaves

Peel the potatoes and cut into 4-5 cm cubes. In a large wok or frying pan with high borders heat the oil and add the garlic cloves and nigella seeds. When the seeds start to crackle add the ground coriander, cumin, turmeric, and a little salt. Add the cubed potatoes and coat well with the spices. Stir constantly, and when the potatoes start to become too dry add a cup of water. Cover and simmer on low, stirring from time to time and adding water every time the mixture gets too dry. When all the potatoes are cooked, and most are almost pureed and creamy, remove from the heat. Finely chop a cup of washed fresh coriander or parsley (or a mixture of both) leaves, and add to the potatoes. Stir and serve.


 Photos and Recipes by Alessandra Zecchini ©


Thursday, March 17, 2011

Vegan Pizzoccheri


Pizzoccheri is a traditional pasta from Valtellina, in the North of Italy, made with a percentage of buckwheat flour. The taste is similar to the Japanese buckwheat noodles (soba).
The traditional recipe for pizzoccheri, born in the village of Teglio, is to boil them together with pieces of potatoes and green cabbage (put the potatoes in the biling water first, then the cabbage and the pizzoccheri (which take about 15 minutes to cook). Pick up everything with a slotted spoon and mix with casera cheese and butter melted with garlic. Very filling! A vegan could stop at the cheese and butter steps, adding a little tamari sauce instead, and the stock from the pizzoccheri can also be recycled in real Zen style as it is full of proteins. But I didn’t feel like going for Asian flavours.
So I made mine with onion, potatoes, spinach and walnuts.


Ingredients
500 g pizzoccheri
1 small white onion
4 tbsp extra virgin olive oil
1 big boiled potato, peeled
1 bunch spinach leaves, washed
1 handful freshly shelled walnut kernels
salt and pepper to taste


Cook the pizzoccheri in plenty of salted boiling water according to packet instructions. Finely chop a white onion and sauté with two tablespoons of extra virgin olive oil. Add the boiled potato, cubed, and after a few minutes the spinach leaves and the walnut kernels. Add a couple of ladles of the water from the pizzoccheri and cook until the potato pieces start to mush. Add salt and pepper to taste. By this time your pizzoccheri should also be ready, drain them (keep the water if you like for later use as a stock), and place in the pot with the potatoes. Add two more tablespoons of extra virgin olive oil, stir and serve.
Serve 4 as a complete meal, very filling!!!


 Photos and Recipes by Alessandra Zecchini ©


Monday, March 14, 2011

Stewed Borlotti Beans with Smoked Paprika


Soak the borlotti in water for 10 hours, changing often the water and washing them at the same time. Then cook them with plenty of water, removing any scam that forms at the top with a slotted spoon.
They should cook in one hour, taste to see. I add salt when they are nearly ready, and when I stopped removing excess scum from the top. Your beans are ready for any recipe now! Keep the stock, it can be used for soups, or as stock when a recipe requires it.


Stewed Borlotti Beans with Smoked Paprika

Here I chopped a small white onion, a small carrot and a celery stalk with leaves. I sautéd the vegetables with some extra virgin olive oil, and then I added the beans, and some of their sock, which is already salty.


I cooked the beans, adding stock little by little, until they started to mush lightly. I added some smoked paprika, stirred, and served with some crusty bread on the side.


 Photos and Recipes by Alessandra Zecchini ©


Saturday, March 12, 2011

Pistachio pesto


I decided to try to make pesto with pistachio nuts (usually it is made with pine nuts): in a mortar I put a little garlic (peeled), some pistachio nuts (also peeled), and some leaves of Genovese basil (Genovese basil is the one with very small leaves). I worked the pesto with a pestle and added more leaves little by little, and at the end a little salt and olive oil. You need patience with a mortar and pestle, but the results are great. Also, basil should never be cut with a metal blade (knife or blender), don't ask me why, but the flavour changes!!!

Use to dress pasta or potatoes, to top pizza, and on your favourite grilled vegetables.


 Photos and Recipes by Alessandra Zecchini ©


Thursday, March 10, 2011

Blood Red Orange Juice


This is not a recipe, sorry, but I wanted to show you how beautiful and red are the Sicilian red oranges! I made a juice and it was so sweet that the children asked me if I added sugar to it: no, no sugar, just fresh red orange juice, lovely and sweet. 

Drink it quickly as vitamin C tends to 'evaporate' in the air...apparently! 


 Photos and Recipes by Alessandra Zecchini ©


Sunday, March 6, 2011

Rice, Barley, Spelt and Vegetable Italian Soup


For this soup I used a packet of 3 parboiled cereals: rice, barley and spelt. The brand is Gallo – a mainstream Italian rice brand. Traditionally Gallo brand had rice only, so I was happy to discover this 3-cereals combo, which is easy to use.


Ingredients

1 carrot
¼ green cabbage
1 leek
1 celery stalk, with leaves
100 g fresh or frozen borlotti beans
a few parsley leaves, chopped
2 l water
rock salt to taste
black pepper
200 g Gallo brand mixed rice, barley and spelt
1 tbsp tomato puree
Extra virgin olive oil


Cut the vegetables and place in a large pot with the water. Bring to the boil, remove the scum that may form at the top, add salt and pepper and then simmer slowly, for 10 minutes. When the beans look cooked add the cereals (they are parboiled so they will take about 15 minutes, but cook them for at least 20 to get the flavour through). Add the tomato puree, and then remove from the heat. Serve hot or warm, drizzled with olive oil. It tastes better the day after.


 Photos and Recipes by Alessandra Zecchini ©


Thursday, March 3, 2011

Making Fregola Sarda step by step


Making Fregola


I dug out these photos for my friend Tiziana, who was here with me making fregola (or fregula), and she is now a vegetarian! Fregola is something between cous cous and pasta, thicker than the former, and smaller than the latter.


Start with a blend of fine and coarse semolina and a little salted water.
You just need to sprinkle some water on you semolina mix.


Mix mix mix


collect the pellets


pass them through a sieve, keep only the big one and let them dry for 24 hours.
Start over with the smaller ones to make them as big as you like.


We cooked the fregola like a risotto. First chop and saute some fresh vegetables,


slowly add vegetable stock and, finally, saffron.


Yum!


Photos and Recipes by Alessandra Zecchini ©


Sunday, February 27, 2011

super easy plum tart


The plum season is coming to an end, let's make the most of it!


All you need here is some frozen vegan puff pastry (I used New Way brand), which is already rolled into squares. Place the pastry on a oven tray lined with baking paper. Brush the surface with water or lemon juice and then sprinkle with caster sugar. Wash and cut the plums into two halves and remove the stone (you will need free stone plums, I used Luisa yellow plums and Black Doris from my local orchard in Oratia for this recipe) and place, cut side down, on the pastry. Bake at 180°C for about 15-20 minutes, or until the side of the tart have puffed up and are golden.

During plum season I make this at least once a week, eat warm (with ice cream) or cold (cut into small squares for breakfast or for lunch boxes).


Photos and Recipes by Alessandra Zecchini ©


Friday, February 25, 2011

Pasta with Field Mushrooms


Only one thing beats finding field mushrooms: to be presented with some...


Dan gave me a bag of field mushrooms.


To clean the mushrooms let them stand with a little rock salt. This way the worms (if any) will run away...towards the sink! Brush the mushrooms with a damp paper towel, but do not immerse in water.


Sautéed three garlic cloves (peeled) with vegetable margarine, add the mushrooms, chopped. When the mushrooms stop putting out water add 200 ml of vegetable stock. Cook slowly until all the stock has been absorbed, then add a little more margarine, turn element off and add plenty of finely chopped parsley. To get the most out of the garlic remove the three cloves and squeeze them with a garlic press back into the sauce. The garlic will be lovely and soft and with a delicate flavour. Cooked some pasta (I used 500 g, penne), drain and mix with the mushrooms.


Photos and Recipes by Alessandra Zecchini ©


Monday, February 21, 2011

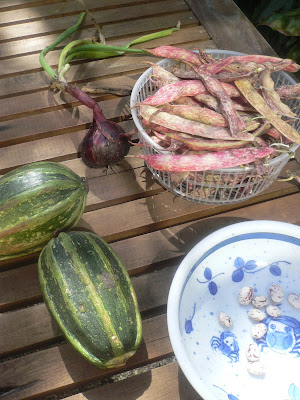
Kamo Kamo Maori Squash and Italian Borlotti Beans


From my garden, and my friends' gardens


A crop that gives me great pleasure is borlotti beans, not only for their flavour but also because I love the idea of growing protein food! I eat fresh borlotti, or I dry them and then use them to make nice soups and stews. 

A Maori friend gave me some kamo kamo, the traditional Maori squash, and told me that the way to eat it is to boil it (skin on) and then cut it and spread it with butter (or olive oil... for me!) salt and pepper, and scoop the flesh out with a fork.


I had two kamo kamo so I boiled one (as a was told) and cut the other and sauted with a drop of olive oil and other vegetables from my garden: red onion, and celery.

Then I added the beans and some water, salt and pepper, and cooked everything until the beans were soft.


I added water little by little, when necessary, and I thought that this would be good with more vegetables (maybe a little carrot and some parsley leaves) but I didn't add anything else as these have quite strong flavours and I really wanted to taste the kamo kamo as much as possible. The resulting stew (or soup, if you use more water) was nice although the kamo kamo doesn't have a distinctive flavour like pumpkin.


For the second experiment: well, nice to have the kamo kamo as a side vegetables with olive oil, but once agin I think that my husband liked it more than I did. Next time I will need to put something 'stronger" on, like pesto, or a sesame seed and miso dressing :-)


Photos and Recipes by Alessandra Zecchini ©


Sunday, February 20, 2011

Peach Smoothie


From my garden

I have a peach tree, grown from a discarded seed in the bush. Actually, there are two, but one is quite deep in the forest, while the other was struggling in the border of the open garden, battling for space. We don't cut native trees in the Waitakere ranges, this is a protected area, and I wouldn't do it anyway, so no chances of me clearing the space around the poor fruit tree! But it was close enough for me to train it to grow sideways out of the forest and into an open space, over the little Japanese garden I built. In fact it looks quite like a gigantic bonsai now, and in spring the flowers really suit the Japanese garden.

For many years I only had a handful of peaches, but finally this summer the tree was full!


The peaches are smaller than the ones I can find in shops, but they taste great, and they are mine!! What a satisfaction! Thank you lovely tree! A part from eating them by themselves I am making smoothies, like this one, with peaches, banana and apple juice from the local orchard. Blend together and decorate with borage flowers.


Photos and Recipes by Alessandra Zecchini ©


Tuesday, February 15, 2011

Torta di Verdure in Scapece: my Favourite Summer recipe!!!


Yes, this is my favourite creation, it takes time to make but it can last a week, and the flavour gets better and better. For the ingredients...no measures really, just be aware that you will need a lot of olive oil and lots of eggplants (I use both Italian eggplants and the long Asian eggplants), plenty of zucchini, and red, green and yellow capsicums. Cut all the vegetables in long and large strips, sweat the eggplants with salt for 30 minutes, then rinse and pat dry. Then, using plenty of olive oil, start frying. This is going to take a looooong time. First fry the zucchini, then set aside. Fry the eggplants, set aside; finally fry the capsicums (which have the strongest flavour, so they would alter the flavour of the oil). You will need to add oil from time to time, and be very careful to cook well the vegetables without burning them. When the capsicum are cold remove and discard the skins.

Finely chop plenty of garlic with tons of parsley. Add few more herbs if you wish, either a little mint of a little basil are good. Add salt to taste. You should make about a cup of this. Line a container with grease-proof paper and make a layer of vegetables (this will be the top, so make it pretty!), add some chopped herbs, then a few drops of white wine vinegar and sprinkle with breadcrumbs. Repeat, making as many layers as you can. Top with some more grease-proof paper and press down gently. Refrigerate for one day. Before serving you can tip the 'torta' on a platter, and then cut into small slices. You will get many portions out of it, as it is so compact and full of flavour!

For a Gluten free version omit the breadcrumbs.


Photos and Recipes by Alessandra Zecchini ©


Saturday, February 12, 2011

Coconut Rice with Vietnamese Mint


riso al cocco Mint from my garden


This is a lovely way to serve rice, one of my favourites in fact!

Ingredients

400 g Thai rice
1 x 400ml can coconut cream
half tsp salt
Vietnamese or Thai mint (optional)

(In Thailand they also add sugar, but I prefer not to).

Wash the rice a few times with cold water, place it in a saucepan and add the content of the can of coconut cream plus half a measure of water from the same can (in this way you can also rinse the coconut cream out). Add salt and cover with a lid. Cook very slowly by absorption, if your lid is not very heavy line it with a tea towel to avoid loosing too much steam during cooking.

When the rice is ready turn the heat off and let it rest for 10 minutes before serving. At this point you can also add some fresh leaves of Vietnamese or Thai mint (they are similar, but I prefer the Vietnamese one!). The leaves will perfume the rice and give it more flavour.

Photos and Recipes by Alessandra Zecchini ©